Showing posts with label eat. Show all posts

Tuesday, 29 December 2015

recipe: really yummy lactation cookies


Lactation cookies. Yes, lactation cookies are a real thing. And all cookie lovers who lactate rejoice.

One of the greatest things to happen to me this time around is being able to nurse my son (you can read about my nursing struggles with my firstborn here). Unfortunately, I don't have amazing supply so I've had to resort to all the crazy supplements and pumping sessions to keep the milk flowing. But these lactation cookies are by far the most enjoyable way to boost my supply. And yes, I do believe they work. But even more wonderful than that is that they really are yummy!

So how do lactation cookies work? Well, they use "galactagogues" (yes, a real word) that women have been swearing by for decades -- namely, brewer's yeast, oats, and flax -- to boost supply. 

Now these cookies do come with a warning: they are not low fat and they will not help with your post-baby weight loss. sorry. But they are yummy and when it's 3 am and you have a ravenous newborn AND you've got the nursing munchies, the calories simply don't matter.

Ingredients:

3 cups rolled oats
1 1/2 cups all-purpose flour
6 tablespoons brewer's yeast (*this is a crucial ingredient! don't skip it! you can find brewer's yeast at your local Bulk Barn)
3 tablespoons ground flaxseed
1/2 teaspoon baking powder
1/2 teaspoon baking soda
1/2 teaspoon ground cinnamon
1/4 teaspoons salt

3/4 cup butter
5 tablespoons coconut oil
1 1/2 cups white sugar
2 eggs
1/4 cup peanut butter

1 1/2 cups chocolate chips

Directions:
Preheat oven to 350 degrees. Combine the first 7 ingredients in a large bowl. In a separate bowl (I use my stand mixer) combine the butter and oil and then add the sugar, beating until fluffy. Follow with the eggs and peanut butter until well combined. Add the wet ingredients to the dry ingredients and then add the chocolate chips.

Scoop onto baking sheet and bake for 10 minutes (don't overdo these unless you like them crunchy) or until done.

I modified this recipe from here.

Enjoy!

To yummy galactagogues,
♥ Dion

<

Tuesday, 11 August 2015

recipe: savory & sweet bacon cheddar & onion muffins

At 32 weeks pregnant I am still looking forward to that energy burst that comes in the "nesting" phase...but alas most days I waddle around the house attempting to keep up with my toddler and taking breaks to rest while my husband is still home on summer holidays. But when I do nest, it is almost always in the kitchen -- cooking or baking. Today I whipped up FOUR BATCHES of these savory (and a bit sweet) bacon, cheddar & green onion muffins that are always a hit in our home. The word muffin is a little misleading--these babies are more like a biscuit. They are so versatile -- they make a great breakfast when you are on the go, they hit the spot when you just need some carbs, and they pair perfectly with a bowl of warm soup. I've frozen most of them in preparation for baby's arrival in October. I know my husband appreciates breakfast options he can take in the car, especially when he's sleep deprived; and for this soon-to-be mama of two, I know I'll need quick breakfast items on hand to get me through the busy mornings.

savory & sweet bacon.cheddar.onion muffins
yields two dozen muffins

ingredients:
2 cups flour
1/4 cup granulated sugar
1 tbsp baking powder
1/2 tsp baking soda
1 cup grated cheddar cheese
1/4 cup fresh bacon bits (or to taste)
1/4 cup chopped green onions (or to taste)
1/4 cup vegetable/canola oil
1 cup buttermilk
1 egg

directions:
- Preheat oven to 425 degrees
- Sift together first 4 ingredients
- Stir in the grated cheese, bacon bits and green onion
- In a separate bowl beat oil, buttermilk, and egg, and pour into dry ingredients
- Stir to blend -- as always with muffins, do not overmix
- Fill muffin cups and bake

-If you want, in the last five minutes of baking time, top with some extra shredded cheese and return to the oven to finish baking.

Easy!

A couple tips to save you time/energy/money:
- You can buy powdered buttermilk from your local bulk foods store and use that instead of buying fresh buttermilk each time. Don't forget to mix the powder with the right amount of water...is that obvious? I don't know. haha.
- Don't buy those dehydrated fake bacon bits from the grocery store. Instead use the real bacon bits that come in 100 gram bags at the store. These need to be refrigerated once open. I've never used freshly cooked bacon, but I'm sure that would be pretty delicious too. Just make sure the muffins don't get too greasy.

To trying to nest somewhat successfully,

♥ 
Dion 


Saturday, 20 June 2015

Recipe: French Toast Souffle

Hey mamas! Have you figured out what you're serving your man for Father's Day breakfast yet? My hubby appreciates a good breakfast -- especially when it involves french toast! Here's modern, make-ahead twist on your typical french toast breakfast that's certain to wow your man or any brunch guest!

French Toast Souffle

*Note: This souffle must sit overnight in the fridge

Ingredients:
10 cups of french bread cubes (about 1- 1&1/2 large loaves...not the long skinny ones!)
1 8oz package of low fat cream cheese, softened
8 large eggs, ideally room temperature (but not essential)
2 1/4 cups of 2% milk*
1/2 cup maple syrup
1/2 tsp vanilla extract
cinnamon/nutmeg, if you like

*some milk may be substituted for cream if you want an even richer texture


Directions:

1. Add bread cubes to a greased 9x13 inch baking pan.
2. Beat cream cheese at medium speed until smooth. Add room temperature eggs one at time, mixing well between each addition (if your eggs are room temperature, the cream cheese shouldn't become chunky -- although it really doesn't matter to the flavour of the dish). Add milk, maple syrup, vanilla and cinnamon/nutmeg and mix until smooth.
3. Pour the milk mixture over the bread cubes; cover and place in the fridge overnight.
4. In the morning, take the souffle out of the fridge and allow to sit at room temperature for around 30 minutes. Preheat the oven to 375 degrees.
5. Bake covered for 30 minutes in the preheated oven; uncover for additional 5-10 minutes until set and browned nicely on the top.
6. To serve, sprinkle with icing sugar. I also like to serve it with fresh fruit or fruit syrup.

How I make my fruit syrup:
In small saucepan, warm 1-2 cups of your favourite frozen fruit (I like a wildberry mix) on low heat. I sometimes add a few tablespoons of water to the sauce to smooth it out a bit. As the berries thaw and become soft, add granulated sugar, a tablespoon or two at a time, depending on how sweet and thick you want it! Keep stirring until the sauce thickens. Serve warm.

You can't go wrong with this yummy breakfast for your man!

Because the way to a man's heart is through his stomach,

♥ Dion


Sunday, 11 January 2015

How to: Cookie Monster Cupcakes

Excitement cut through the frigid Alberta air last weekend as we celebrated our sweet Gemma’s second birthday! In many ways celebrating her second year of life was more emotional than her first -- it felt like the first of, what will be many, leaps in our little girl’s life journey. We now have a toddler, and with the exception of her being in diapers, it seems as if there is little “baby” left.


Like many toddlers, Gemma is OBSESSED with all things Sesame Street, especially Elmo and Cookie Monster. So, a Sesame Street themed birthday party seemed fitting. I decided to tone things down from Gemma’s first birthday party (a Hawaiian Luau theme which basically took over our Christmas holidays that year!) and keep it simple.


The central component to her birthday were the cupcakes (of course! I LOVE to bake so naturally that’s where my focus was).


I went with these cookie monster cupcakes:


Cute hey!? The best part is, they were very simple.


What you need in addition to the obvious cake mix and liners:

  • blue gel paste food colouring
  • white Merckens wafers
  • black decorator’s icing tube
  • piping bag with a medium sized star tip
  • chocolate chip cookie dough or a box of cookies


Here’s the step by step to making these:
Step 1: Use your favourite recipe/boxed cake mix for the cupcakes (I must admit, I often use boxed mixes...they are pretty good!). Line your tins with greaseproof liners (I always order mine from etsy) so that the colour of the liner stays vibrant.


Step 2: Make your buttercream icing and colour it blue using gel paste food colouring. This is key! The type of food colouring from the grocery store will not give you the vibrant colour you need. I used the Duff brand (found at Michael’s) in electric blue, and toned the colour down a smidge using a TEENY TINY amount of black.


Step 3: When your cupcakes are thoroughly cooled (do not try to ice warm cupcakes or the icing will melt), use a star tip to pipe on Cookie’s fur. You basically plop one star on and another right beside it, going around the whole cupcake. Along the top half of the cupcake I added some more stars to give his face a more three-dimensional look. Be sure your icing is very cool (and not warming up inside the bag from the heat from your hands) so that the icing is firm. We want Cookie’s fur to look furry!


Step 4: Lay out enough white chocolate wafers (you can buy these at Bulk Barn) to make the number of eyes you need. Pipe on small circles using black icing (just buy a small tube from Bulk Barn). Pay attention to where you pipe the pupil so that Cookie will have the ‘googly’ eye effect. When the black icing is dry enough to transfer, place the eyes on the top of the cupcake.


Step 5: For the mouth, bake small cookies using Pillsbury dough. I made sure the cookies were small enough to fit Cookie’s mouth and I made sure they were very chocolate-chipy, sometimes adding extra chips to the dough. I cut ⅓ of the cookie off and placed the remaining ⅔ rds of it in Cookie’s mouth. This was a little tricky, so I ended up piping some icing on the hidden portion of the cookie to keep it in place. You could also buy packaged cookies to save time!


Step 6: Refrigerate or freeze immediately so that cookie stays in place! If you freeze your cupcakes, be sure to take them out of the freezer two hours before serving.


Some other ideas for her birthday were:


  • Use the leftover cookie dough to make a giant cookie! I piped ‘Happy Birthday Gemma' since I couldn’t really do that on her cupcakes and it doubled as another centrepiece.


  • Use Sesame Street wrapping paper to wrap presents. If the presents are large enough, they actually serve as decor for the party!


  • Use your local party store supplies. It’s tempting to go all pinteresty for your kid’s birthday, but let’s be honest, most people don’t have the time to re-create everything they see on pinterest, and the focus should be on your kid anyways. I got balloons, napkins, plates and table confetti for around $30 at the party store, and Gemma just loved seeing all her favourite characters’ faces on everything.


To cupcakes and cookies, and making a little two year old’s day,
♥ Dion

Monday, 11 August 2014

The Five Best Cookbooks for Healthy Family Cooking


I have a confession: I am a cookbook addict. I don’t know what it is, but whenever I see a beautiful cookbook on a store shelf, I just have to have it! Each Christmas I give my husband some not-so-subtle hints about cookbooks I’d love to own, and I usually find one waiting for me under the tree. A cookbook might be a risky gift for some husbands, kind of like buying your wife a personal clothing shopper (yes, we know a guy who did that!). It might not send the right message. But to me, a thick cookbook with a beautiful cover doesn’t tell me I need to cook more or better, it inspires me to try new things in the kitchen and incorporate even healthier foods into our every day diet.
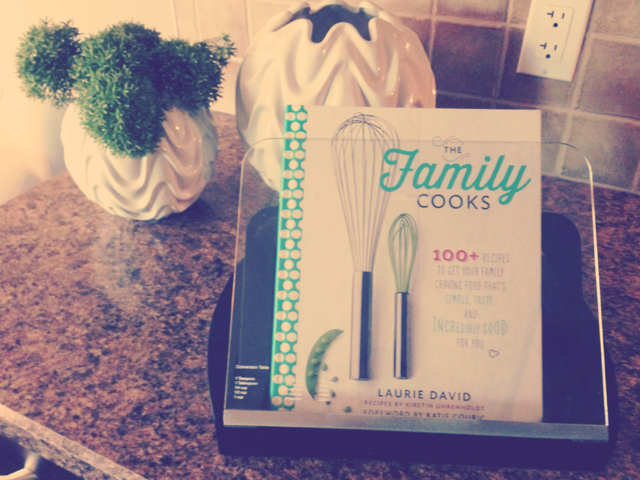
 When friends come over they often see what cookbook I have on display (yes, I have a display) and thumb through it. They are always a talking point in our home. The other day one of these friends asked for a list of my favourite cookbooks for healthy family cooking, leading me to write this post.  Busy moms like us want to cook healthy, affordable meals for our families, but we don’t have the time to pour over new recipes and figure which one will work. Cooking can be a bit of gamble like that. So to take out the guess work, here are the top five cookbooks for families that I rely on most to serve up delicious, healthy and affordable meals each evening. If you’re really out to save money, check out this post on meal planning.

#1 – Looneyspoons by Janet and Greta Podleski. – This is a VERY popular cookbook in Canada, and for good reason (which I’ll explain in second). I’m serious when I write this -- If you don’t have this cookbook, you need to stop reading, go to your local bookstore and pick it up right NOW. Yup, stop reading. Go to the mall.

What I love about this cookbook is its premise. Two sisters decided that they wanted to eat healthier, but still enjoy all their favourite foods. They made minor adjustments to recipes that decreased the fat, sugar and sodium, while retaining (and even amping up!) all the flavour.

I do probably 80% of my cooking out of this cookbook. The recipes are easy to make and don’t use any fancy shmancy ingredients that you can’t pronounce. I love all the photos so you can visualize exactly what you are going to cook--something I look for whenever I purchase a new cookbook. Don’t be turned off by the “loony” play-on-words titles for each recipe. Although they are actually kinda funny, I always have to read the sub-title to know exactly what I’m making! A huge plus to this cookbook is that it includes all the nutritional information such as calories, fat, sodium, etc for each recipe.

There are hundreds of recipes in this cookbook, and I’ve cooked a lot of them. Some favourites are: Maui Wowie Chicken (chicken with pineapples, peppers and carrots), The Nutcrocker (slow-cooked peanut-ginger chicken thighs), The Six-Million-Dollar Manicotti (chicken and vegetable stuffed manicotti), The Yellow Bows of Texas (turkey and bean chilli on top of pasta), FULLafel Patties (their twist on the mid-Eastern falafel), Lasagne with Mex Appeal (Mexican Lasagne), and the list could go on.

Tonight I made Indian Appleous 500 (coconut-curry chicken with apples). It was a hit with the hubs and the toddler. A home run in my books.

I could go on about this cookbook forever, but to keep it short, if you buy one cookbook from this list, Looneyspoons is the one to go with.


#2 – Jamie’s Food Revolution by Jamie Oliver – When I was first married, I cooked from this book A LOT. At the time we were really into watching Jamie Oliver’s Food Revolution tv show and I found this cookbook, inspired by the show, at Chapters. Since it was the first time in my life I really had to cook for someone else day in and day out, I pretty much relied on this cookbook for meal ideas each week.

The meals are packed full of flavour and are healthy, although no nutritional information is given (sad face). And you might think that recipes by a celebrity chef would be tough, but these truly are straightforward. He includes pictures of each step, so its pretty hard to mess up! My favourite part of the cookbook is the “Twenty Minute Meals” section. These are perfect when you need to whip up a quick meal after work. Matt’s favourite is the Quick Salmon Tikka with Cucumber Yogurt and my favourite is the Classic Tomato Spaghetti. And if you love curry dishes, there is a “Quick Curries” section that gets a lot of use in our household (Gemma eats it too!).

#3 – Quinoa 365 by Patricia Green & Carolyn Hemming – I picked up this beautiful cookbook after I decided that I wanted to cook more with quinoa (a super-food you should definitely incorporate into your family’s diet) but I was really lost as to how to use it. After thumbing through the book and stumbling on its baby-food section, the new mom in me was sold. In Quinoa 365 are some of the most yummy baby food recipes that Gemma loved, like Chicken Veggie Mélange; Chicken, Quinoa and Apple Puree; and her absolute favourite, Blueberry Banana Mash.

But there’s much more than baby food in this cookbook. There’s a great introduction section that explains all you need to know about quinoa, its different types and a variety of ways to cook it. I have a tab on the cooking instructions page so that its easily accessible, especially when a recipe in a different cookbook calls for cooked quinoa.

Some favourite recipes are the Black Bean Quinoa Quesadillas, Black Bean Soup, and a recipe that I make and freeze for every new mom, Cheese and Spinach Frittata.

There aren’t as many pictures as I’d like in a cookbook, which is why sometimes I veer towards other cookbooks more, but every recipe I try is awesome and a ‘make-again’. There is no nutiritional information but you can tell the recipes are very healthy, and each recipe is labelled whether it is gluten-free, vegetarian or “kid-approved”, which is really handy!

#4 – The Oh She Glows Cookbook by Angela Liddon – When I first saw this cookbook, I wanted it purely for its gorgeous cover and how nice it would look on my counter. But it’s a vegan cookbook and we are a meat & dairy loving family -- I doubted we’d like it. Then through the power of instagram I saw all these people hash-tagging pictures of these awesome looking meals they’d made with #osg. I did a little digging and saw that it was referring to Oh She Glows! Since other meat & dairy loving friends were cooking from it, I thought I’d give it a chance too! Besides its beauty, this cookbook has so many awesome features: easy ingredients you can find at your local grocery store or costco, a list of what each recipe is free from (i.e. gluten-free, grain-free, dairy-free, oil-free, etc.), and lots of photos.

At a recent party I made the “glowing strawberry-mango guacamole” which was a huge hit. For breakfast I love to make the cover recipe, “effortless vegan overnight oats” that had me fall in love with this cookbook in the first place.

#5 – The Family Cooks by Laurie David and Kirstin Uhrenholdt – This is my newest cookbook (a recent birthday gift) so I haven’t had a lot of opportunity to cook from it. It totally meets my beautiful cookbook requirements and everything I have made has been awesome! This book is all about healthy eating for the whole family, and teaching your family to stop relying on sugar and other detrimental additives to our food. There’s a great smoothie section that I’ve frequented lately and Gemma and I recently made “seedy crackers”, the author’s alternative to goldfish crackers (aka baby crack cocaine) to take on our family holiday to Kelowna (a 10 hour drive!).

I hope one of these cookbooks finds its way into your kitchen soon and inspires you to keep cooking wholesome meals for your whole family!

To cookbook addictions,
♥ Dion

P.S. - Help further my cookbook addiction by commenting on your favourite healthy cookbook for the fam.

 

Sunday, 6 July 2014

How I Con My Toddler into Eating Spinach EVERY Morning – Recipe: Gemma’s GREEN Smoothie

We are officially in the toddler picky-eating stage. It’s brutal. One moment she’s stuffing her face with what I’ve made for her, the next moment the whole plate is on the floor, on her head, or even better, all over mommy.  Last night for dinner Matt and I had hot dogs – Gemma, on the other hand, LITERALLY ate  ketchup by the handful. Tell me you can relate. Please, tell me.

So when I find a meal that is healthy that Gemma will consistently eat, I’m sure to put it in the rotation frequently.

Although Gemma is great at eating her fruits, and not bad at eating veggies (meat is a whole other story), I like to feed her smoothies for breakfast to make sure she’s getting all her nutrients. Lately I’ve been making this green smoothie for her, and its fast becoming a favourite for her. I know some toddlers have an aversion to eating anything green, but Gemma hasn’t developed this yet. I’m hoping that as long as I keep offering her some green foods that she enjoys, that she’ll continue to try other green foods I serve.

Gemma’s GREEN Smoothie

Blend all the following ingredients well to ensure there are no chunks and serve immediately. Serves 2-3 (or one Gemma – she keeps asking for “mo”).

1 cup unsweetened almond milk (or other preferred milk)

1 cup fresh spinach leaves

1 pear or apple

1 peach or ½ mango

1 banana

2-3 pitted dates*

1 tablespoon ground flaxseed or chia seed

3-4 ice cubes

*dates are an awesome way to sweeten smoothies without using sugar

Yum!
To conning children into eating their veggies,

♥ Dion

Wednesday, 21 May 2014

Recipe: Sweet Pineapple and Pork Kebabs

I'm from Alberta, where the bbq'ing season is short and sweet -- unless of course you bbq in the snow, which many an Albertan is known to do! One thing I love about bbq season is that it makes meal planning so much easier. Choose your meat, choose your veggies, season, plop on bbq and voila!

I've been craving shish kebabs a lot lately and thought I'd share this easy, healthy recipe that we've bbq'd a few times already this year! These are so delicious -- I've seen Gemma down an entire kebab in a sitting, which is saying something since dinnertime is usually the most challenging meal of the day with our little girl.

Sweet Pineapple and Pork Kebabs
Makes 8-10 kebabs

Cut the following ingredients into 1 inch chunks:
1 pork tenderloin (chicken breasts would work well too)
1 medium pineapple
1-2 green bell peppers, or any variety of peppers
1 red onion
1 pint cherry tomatoes (don't chop these)

Honey (for brushing on the kebabs)

Thread the ingredients onto shish kebab skewers, alternating between ingredients (remember that if you use wood skewers you need to soak them in water prior to threading the veggies and placing on the bbq).

Season with salt and pepper and bbq until tenderloin is cooked.
As you bbq, brush the kebabs with honey and rotate. Use as much honey as you wish, but I like these kebabs sweet, so I am generous with it.

Serve on a bed of rice, or, for an even healthier option, quinoa. A little dash of soya sauce goes well on the rice/quinoa.

If you have lots of pineapple leftovers, try grilling the extra pineapple for dessert--always a hit in our house! You can find many recipes for seasoned, grilled pineapple online.

Let me know if you try it!

To healthier and happier mealtimes!

♥ Dion

Sunday, 27 April 2014

Recipe: Peanut Butter Protein Balls


All props go to my husband for discovering this recipe from Men’s Health a number of years ago.  We try to make these on Sunday for a handy snack throughout the week.  Although they are probably intended as an after workout snack, we often throw these babies in our lunches for a filling mid-morning/mid-afternoon snack.  The best part is that these are super easy to make and you likely have most of the ingredients in your pantry right now!  Below is the recipe including a few additional ingredients we like to throw in.

Ingredients:
2 cups crunchy peanut butter (we never have crunchy so we use smooth and then add chopped peanuts)
2 scoops chocolate whey-protein powder

2 very ripe bananas, mashed

2 tablespoons whole flaxseeds (Yay omega 3’s! Apparently you don’t get the benefits of flaxseed unless they are ground, so that is something to consider. I like using whole flaxseeds because they make the balls kind of crunchy.)

Additional add-ins:
-          Hemp hearts (I buy these from Costco. These are FULL of protein, fibre, iron and omega 3’s)

-          Chia seeds (I usually buy these from Bulk Barn, but  they are readily found in the health-food section of the grocery store.  Chia seeds have similar health properties to hemp hearts and flaxseed.)

-          Rolled oats

-          Chopped peanuts

-          Chocolate chips (because everything is better with chocolate!)

Mash the bananas and then combine all the other ingredients.  Use a tablespoon to scoop out the mixture and roll using your hands into approximately 25 balls. Place balls on parchment paper (on a cookie sheet or in a Tupperware container) and place in the freezer.  These taste best frozen to slightly thawed so be sure to keep them stored in your freezer!

I was going to post a picture, but no matter what angle I took the picture from, they just looked like meatballs or turds, haha! Not too appetizing.  Just trust me – they taste better than they look.

Happy snacking!
♥Dion

Friday, 25 April 2014

How I Save Time: Meal Planning & Groceries


Ask a mom what time of the day is most stressful for her and she’ll probably tell you, hands down, that it’s dinner time.  Those last hours before bedtime can feel like an eternity and the thought of cooking a decent meal with a hungry, overtired toddler pulling on a leg of your sweatpants is just way too much.  It’s the time when you need your spouse’s help the most. I gotta admit I’ve stood staring at the clock on the microwave, trying to will it to say 5:00 because that’s the glorious time when my husband gets home from work.  It’s amazing how the hum of a garage door opening can sound oh-so-sweet.  

Dinner time doesn’t always have to be this way.  The nights when I’m well-prepared give me the head space to entertain Gemma while anticipating Matt’s arrival home.  Especially now that I am working mornings, preparation is crucial; Gemma really needs to nap by the time we get home from school which makes a mid-afternoon run to the grocery store out of the question.  So how do I put a healthy, delicious meal on the table before 8:00 pm?

The first thing I do is avoid the grocery store as much as possible (I love to shop, just not for food).  In addition to meal planning (which I’ll address in a minute) I make a thorough list throughout the week of anything we are out of, immediately when I notice we’ve run out of it. I use this cute checklist on my fridge to keep track. 
That way I only go to the grocery store, at most, once a week.  And one of the best decisions I’ve made recently is ordering my produce through the Organic Box.  Once G started eating solids I became determined to avoid feeding her the non-organic “dirty dozen” fruits and veggies.  But, since we live in a smallish suburb of Edmonton, decent organic produce is tough to find.  In fact, every time I drive home from the grocery store I consider throwing a for-sale sign on my home and moving into the city.  Let’s just say that the lack of choice/availability makes me a tad cranky.  Now that I order from the Organic Box I’m much happier, which is good because we really do love our town J. On Tuesday nights I order my groceries online, while I’m wearing my sweats and drinking my evening tea. On Fridays a nice delivery guy brings my organic produce to my door, and guess what, I’m wearing my sweats and drinking tea.  Not a bad way to grocery shop I’d say.  But, the Organic Box is only really a time and money savings if you organized enough to prepare/eat your produce before it spoils, which makes meal planning even more important in my world.
Gemma helping Mommy unload the Organic Box


OK, so now on to meal planning.  The way I see it is that meal planning is a no brainer -- it saves you time and money.   Instead of wracking your brain for what to serve for dinner, and then taking the time to go to the grocery store to pick up what you need, meal planning ensures you have it in your kitchen, when you need it.  And it also helps to limit those expensive, impulsive dinnertime decisions (I don’t feel like cooking, let’s just order Chinese food).

Here are some key things to remember when meal planning:

Keep it simple – Just plan 2-3 meals a week but make LOTS of whatever you’re cooking.  And make sure that no more than one of those meals involves a recipe that you are unfamiliar with.  Stick with old favourites that you always seem to stock the supplies for and you can make without thinking.  For us that includes: A variety of recipes from the LooneySpoons cookbook (some favourites include: Wowie Maui Chicken, Better Butter Chicken, Unrolled Cabbage Rolls) Quinoa and Black Bean Quesadillas, Pork Fajitas, Buffalo Chicken Chilli, Kale & Eggs (Gwyneth Paltrow’s cookbook: It’s All Good). By cooking just a few favourite meals you’ll have lots of leftovers for the rest of the week. On those other nights when you don’t have a specific meal planned and aren’t eating leftovers, fill in the blanks with simple, no-recipe meals like grilled cheese, tuna melts, hamburgers, stir frys etc.

Keep it routine: Don’t get me wrong, I LOVE cooking and I LOVE eating a variety of food.  But I could easily spend way too much time trying to find new recipes.  So, to make meal planning quicker, we’ve started a family tradition that Friday night is pizza night. Some Fridays I pick up pizza on the way home from work, or we grab the frozen pizzas we stocked up on at the grocery store on sale, or we do pita pizzas.  It’s always different and never fancy, but it takes the pressure off on Friday night.  And by Friday, even I, who really finds cooking enjoyable, am in no mood to cook.  Pair it with a yummy fruit salad and we don’t feel too bad about the calories J.  Another idea is breakfast for dinner on a certain night. We tend to do that on small group nights when we are in a rush to eat and get out the door.  This is also a great way to delegate cooking to other members of the family.  If your husband has a specialty (my hubby’s are egg wraps and pita pizzas – he perfected those in his single days) then he can cook that for dinner.  And depending on the age of your kids, they might participate in cooking.  You could do grilled cheese sandwiches and soup and guide your older children in making them.  When you keep meal planning somewhat routine, it really helps to minimize the time and effort involved in preparing dinner.

Keep it Frozen:  After having Gemma, I remember thinking that I would never cook again.  I figured I’d never have the time.  Fortunately, that eventually passed and I now do have time to cook, but I certainly don’t have time to cook each night.  So, whenever I do make up a family favourite recipe that freezes well, I always try to double or triple it.  Invest in a big stock pot or a couple good sized pots that you can cook these large batches in.  I use my freezer meals whenever I have no time to cook or grocery shop.  A couple weeks ago on spring break I got together with a few friends and we each made a huge batch of a family favourite meal.  It took all day to do, but we each made it home with 9 MEALS EACH.  My freezer is stocked full.  Last week when I was super busy with marks and parent-teacher interviews, I didn’t cook once all week.  We just dug in to all our great freezer meals. Another good idea is pre-prep slow cooker meals (like pulled pork or a yummy chicken thigh in sauce), freeze it in freezer bags, and then thaw and pop in the slow cooker the morning you need the meal.

Keep it handy:  Select one day of the week, for me it is usually Sunday night or Saturday afternoon during my daughter’s nap, and put together some handy breakfast items/snacks.  Here are some great ideas:

-          Egg McMuffins

-          Egg Frittata (cut into pieces – quick and easy breakfast)

-          Homemade granola bars

-          Peanut butter protein balls (I’ll post a recipe soon)

These fill up your lunch bag if you brown-bag it or can be a quick breakfast on the run!  With our busy lifestyle these quick breakfast items are a life-saver on many a morning.

I hope these meal planning ideas inspire you to get cooking without much hassle!
From one crazy busy mom to another. YDion
Related Posts Plugin for WordPress, Blogger...